SELECT id, table_id, indices,create_time
INTO OUTFILE '/usr/local/mysql/tblTest.csv'
FIELDS TERMINATED BY ',' OPTIONALLY ENCLOSED BY '"'
ESCAPED BY '\\'
LINES TERMINATED BY '\n'
FROM tblTest WHERE 1;
Friday, 25 October 2013

Thursday, 24 October 2013
CENTOS install rlwrap for oracle sqlplus
[root@localhost6 ~]# rpm -ivh http://download.fedoraproject.org/pub/epel/6/x86_64/epel-release-6-8.noarch.rpm
Retrieving http://download.fedoraproject.org/pub/epel/6/x86_64/epel-release-6-8.noarch.rpm
warning: /var/tmp/rpm-tmp.rIN0Eg: Header V3 RSA/SHA256 Signature, key ID 0608b895: NOKEY
Preparing... ########################################### [100%]
1:epel-release ########################################### [100%]
[root@localhost6 ~]# rpm --import /etc/pki/rpm-gpg/RPM-GPG-KEY-EPEL-6
[root@localhost6 ~]# yum install rlwrap readline readline-devel
Loaded plugins: fastestmirror, refresh-packagekit, security
Loading mirror speeds from cached hostfile
epel/metalink | 5.6 kB 00:00
* base: mirrors.sin3.sg.voxel.net
* epel: mirror.smartmedia.net.id
* extras: mirrors.sin3.sg.voxel.net
* updates: mirror.colocity.com
epel | 4.2 kB 00:00
epel/primary_db | 5.6 MB 00:00
Setting up Install Process
Package readline-6.0-4.el6.x86_64 already installed and latest version
Resolving Dependencies
--> Running transaction check
---> Package readline-devel.x86_64 0:6.0-4.el6 will be installed
--> Processing Dependency: ncurses-devel for package: readline-devel-6.0-4.el6.x86_64
---> Package rlwrap.x86_64 0:0.37-1.el6 will be installed
--> Running transaction check
---> Package ncurses-devel.x86_64 0:5.7-3.20090208.el6 will be installed
--> Finished Dependency Resolution
Dependencies Resolved
=================================================================================================================================================================================
Package Arch Version Repository Size
=================================================================================================================================================================================
Installing:
readline-devel x86_64 6.0-4.el6 base 134 k
rlwrap x86_64 0.37-1.el6 epel 90 k
Installing for dependencies:
ncurses-devel x86_64 5.7-3.20090208.el6 base 642 k
Transaction Summary
=================================================================================================================================================================================
Install 3 Package(s)
Total download size: 866 k
Installed size: 2.2 M
Is this ok [y/N]: y
Downloading Packages:
(1/3): ncurses-devel-5.7-3.20090208.el6.x86_64.rpm | 642 kB 00:00
(2/3): readline-devel-6.0-4.el6.x86_64.rpm | 134 kB 00:00
(3/3): rlwrap-0.37-1.el6.x86_64.rpm | 90 kB 00:00
---------------------------------------------------------------------------------------------------------------------------------------------------------------------------------
Total 482 kB/s | 866 kB 00:01
Running rpm_check_debug
Running Transaction Test
Transaction Test Succeeded
Running Transaction
Warning: RPMDB altered outside of yum.
Installing : ncurses-devel-5.7-3.20090208.el6.x86_64 1/3
Installing : readline-devel-6.0-4.el6.x86_64 2/3
Installing : rlwrap-0.37-1.el6.x86_64 3/3
Verifying : ncurses-devel-5.7-3.20090208.el6.x86_64 1/3
Verifying : readline-devel-6.0-4.el6.x86_64 2/3
Verifying : rlwrap-0.37-1.el6.x86_64 3/3
Installed:
readline-devel.x86_64 0:6.0-4.el6 rlwrap.x86_64 0:0.37-1.el6
Dependency Installed:
ncurses-devel.x86_64 0:5.7-3.20090208.el6
Complete!
[root@localhost6 ~]#
#Login as oracle user
vi /home/oracle/.bash_profile
#append 2 more lines
alias sqlplus='rlwrap sqlplus'
alias rman='rlwrap rman'
Logout and login again.
--------------------The End----------------------------------------------------------------------
Retrieving http://download.fedoraproject.org/pub/epel/6/x86_64/epel-release-6-8.noarch.rpm
warning: /var/tmp/rpm-tmp.rIN0Eg: Header V3 RSA/SHA256 Signature, key ID 0608b895: NOKEY
Preparing... ########################################### [100%]
1:epel-release ########################################### [100%]
[root@localhost6 ~]# rpm --import /etc/pki/rpm-gpg/RPM-GPG-KEY-EPEL-6
[root@localhost6 ~]# yum install rlwrap readline readline-devel
Loaded plugins: fastestmirror, refresh-packagekit, security
Loading mirror speeds from cached hostfile
epel/metalink | 5.6 kB 00:00
* base: mirrors.sin3.sg.voxel.net
* epel: mirror.smartmedia.net.id
* extras: mirrors.sin3.sg.voxel.net
* updates: mirror.colocity.com
epel | 4.2 kB 00:00
epel/primary_db | 5.6 MB 00:00
Setting up Install Process
Package readline-6.0-4.el6.x86_64 already installed and latest version
Resolving Dependencies
--> Running transaction check
---> Package readline-devel.x86_64 0:6.0-4.el6 will be installed
--> Processing Dependency: ncurses-devel for package: readline-devel-6.0-4.el6.x86_64
---> Package rlwrap.x86_64 0:0.37-1.el6 will be installed
--> Running transaction check
---> Package ncurses-devel.x86_64 0:5.7-3.20090208.el6 will be installed
--> Finished Dependency Resolution
Dependencies Resolved
=================================================================================================================================================================================
Package Arch Version Repository Size
=================================================================================================================================================================================
Installing:
readline-devel x86_64 6.0-4.el6 base 134 k
rlwrap x86_64 0.37-1.el6 epel 90 k
Installing for dependencies:
ncurses-devel x86_64 5.7-3.20090208.el6 base 642 k
Transaction Summary
=================================================================================================================================================================================
Install 3 Package(s)
Total download size: 866 k
Installed size: 2.2 M
Is this ok [y/N]: y
Downloading Packages:
(1/3): ncurses-devel-5.7-3.20090208.el6.x86_64.rpm | 642 kB 00:00
(2/3): readline-devel-6.0-4.el6.x86_64.rpm | 134 kB 00:00
(3/3): rlwrap-0.37-1.el6.x86_64.rpm | 90 kB 00:00
---------------------------------------------------------------------------------------------------------------------------------------------------------------------------------
Total 482 kB/s | 866 kB 00:01
Running rpm_check_debug
Running Transaction Test
Transaction Test Succeeded
Running Transaction
Warning: RPMDB altered outside of yum.
Installing : ncurses-devel-5.7-3.20090208.el6.x86_64 1/3
Installing : readline-devel-6.0-4.el6.x86_64 2/3
Installing : rlwrap-0.37-1.el6.x86_64 3/3
Verifying : ncurses-devel-5.7-3.20090208.el6.x86_64 1/3
Verifying : readline-devel-6.0-4.el6.x86_64 2/3
Verifying : rlwrap-0.37-1.el6.x86_64 3/3
Installed:
readline-devel.x86_64 0:6.0-4.el6 rlwrap.x86_64 0:0.37-1.el6
Dependency Installed:
ncurses-devel.x86_64 0:5.7-3.20090208.el6
Complete!
[root@localhost6 ~]#
#Login as oracle user
vi /home/oracle/.bash_profile
#append 2 more lines
alias sqlplus='rlwrap sqlplus'
alias rman='rlwrap rman'
Logout and login again.
--------------------The End----------------------------------------------------------------------
Wednesday, 2 October 2013
MySQL NDB Cluster Configuration Step by Step
To set up the cluster, I create 5 Hyper-V virtual machine with CENTOS 6.4, one management node, two data node and two mysql node.
192.168.1.144 (mgm)
192.168.1.196 (ndb)
192.168.1.197 (ndb)
192.168.1.152 (mysqld)
192.168.1.193 (mysqld)
Step1:
Download mysql-cluster-gpl-7.3.2-linux-glibc2.5-x86_64.tar.gz binary file from mysql website http://dev.mysql.com/downloads/cluster/
Copy the download file to those 5 Linux server and do the next step on all 5 servers.
groupadd mysql
useradd –g mysql mysql
tar –zxvf /usr/local/ mysql-cluster-gpl-7.3.2-linux-glibc2.5-x86_64.tar.gz
mv /usr/local/ mysql-cluster-gpl-7.3.2-linux-glibc2.5-x86_64 /opt/mysql_cluster
chown mysql.mysql –R /opt/mysql_cluster
On server 192.168.1.196 and 192.168.1.197 create a new folder
mkdir /opt/mysql_cluster/ndbdata
chown mysql.mysql –R /opt/mysql_cluster
Step2:
Mgm Node(192.168.1.144) configuration
cd /opt/mysql_cluster/
vi config.ini
[root@CENTOS2 ~]# cat /opt/mysql_cluster/config.ini
[ndbd default]
NoOfReplicas= 2
[NDB_MGMD]
nodeid=1
HostName= 192.168.1.144
[NDBD]
nodeid=11
HostName= 192.168.1.196
Datadir= /opt/mysql_cluster/ndbdata
[NDBD]
nodeid=12
HostName= 192.168.1.197
Datadir= /opt/mysql_cluster/ndbdata
[MYSQLD]
nodeid=21
HostName= 192.168.1.152
[MYSQLD]
nodeid=22
HostName= 192.168.1.193
Step3:
Install and configure mysql on two mysqld node (192.168.1.152, 192.168.1.193)
cd /opt/mysql_cluster/
scripts/mysql_cluster_install --user=mysql --datadir=/opt/mysql_cluster/data --basedir=/opt/mysql_cluster/
mv /opt/mysql_cluster/my.cnf /etc/my.cnf
vi /etc/my.cnf
[mysqld]
ndbcluster
ndb-connectstring=192.168.1.144
[mysql_cluster]
ndb-connectstring=192.168.1.144
Modify the /opt/mysql_cluster/support-files/mysql.server, replace datadir and basedir
datadir=/opt/mysql_cluster/data
basedir=/opt/mysql_cluster/
Step 4:
Start all cluster and mgm node
Startup data node(192.168.1.196, 192.168.1.197)
[root@Node1]# /opt/mysql_cluster/bin/ndbd --defaults-file=/opt/mysql_cluster/my.cnf --initial
2013-10-02 13:17:36 [ndbd] INFO -- Angel connected to '192.168.1.144:1186'
2013-10-02 13:17:36 [ndbd] INFO -- Angel allocated nodeid: 11
Startup mysqld node(192.168.1.152, 192.168.1.193)

Startup the mgm node
/opt/mysql_cluster/bin/ndb_mgmd -f /opt/mysql_cluster/config.ini --configdir=/opt/mysql_cluster
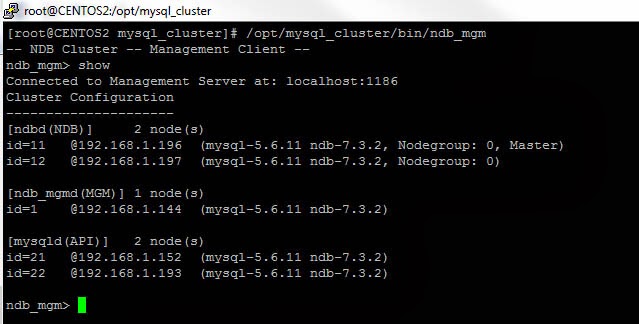
Step 5:
Check status
 -----------------------------------------The End---------------------------------------------------------------
192.168.1.144 (mgm)
192.168.1.196 (ndb)
192.168.1.197 (ndb)
192.168.1.152 (mysqld)
192.168.1.193 (mysqld)
Step1:
Download mysql-cluster-gpl-7.3.2-linux-glibc2.5-x86_64.tar.gz binary file from mysql website http://dev.mysql.com/downloads/cluster/
Copy the download file to those 5 Linux server and do the next step on all 5 servers.
groupadd mysql
useradd –g mysql mysql
tar –zxvf /usr/local/ mysql-cluster-gpl-7.3.2-linux-glibc2.5-x86_64.tar.gz
mv /usr/local/ mysql-cluster-gpl-7.3.2-linux-glibc2.5-x86_64 /opt/mysql_cluster
chown mysql.mysql –R /opt/mysql_cluster
On server 192.168.1.196 and 192.168.1.197 create a new folder
mkdir /opt/mysql_cluster/ndbdata
chown mysql.mysql –R /opt/mysql_cluster
Step2:
Mgm Node(192.168.1.144) configuration
cd /opt/mysql_cluster/
vi config.ini
[root@CENTOS2 ~]# cat /opt/mysql_cluster/config.ini
[ndbd default]
NoOfReplicas= 2
[NDB_MGMD]
nodeid=1
HostName= 192.168.1.144
[NDBD]
nodeid=11
HostName= 192.168.1.196
Datadir= /opt/mysql_cluster/ndbdata
[NDBD]
nodeid=12
HostName= 192.168.1.197
Datadir= /opt/mysql_cluster/ndbdata
[MYSQLD]
nodeid=21
HostName= 192.168.1.152
[MYSQLD]
nodeid=22
HostName= 192.168.1.193
Step3:
Install and configure mysql on two mysqld node (192.168.1.152, 192.168.1.193)
cd /opt/mysql_cluster/
scripts/mysql_cluster_install --user=mysql --datadir=/opt/mysql_cluster/data --basedir=/opt/mysql_cluster/
mv /opt/mysql_cluster/my.cnf /etc/my.cnf
vi /etc/my.cnf
ndbcluster
ndb-connectstring=192.168.1.144
[mysql_cluster]
ndb-connectstring=192.168.1.144
Modify the /opt/mysql_cluster/support-files/mysql.server, replace datadir and basedir
datadir=/opt/mysql_cluster/data
basedir=/opt/mysql_cluster/
Step 4:
Start all cluster and mgm node
Startup data node(192.168.1.196, 192.168.1.197)
[root@Node1]# /opt/mysql_cluster/bin/ndbd --defaults-file=/opt/mysql_cluster/my.cnf --initial
2013-10-02 13:17:36 [ndbd] INFO -- Angel connected to '192.168.1.144:1186'
2013-10-02 13:17:36 [ndbd] INFO -- Angel allocated nodeid: 11
Startup mysqld node(192.168.1.152, 192.168.1.193)

Startup the mgm node
/opt/mysql_cluster/bin/ndb_mgmd -f /opt/mysql_cluster/config.ini --configdir=/opt/mysql_cluster
Step 5:
Check status
Tuesday, 24 September 2013
Add sudo user on CentOS
useradd <username>
passwd ******

edit the /etc/sudoers file add a new line

Test the sudo user
 ---------------------------------The End-----------------------------------------------------------------
passwd ******

edit the /etc/sudoers file add a new line

Test the sudo user

Thursday, 19 September 2013
MySQL-mmm configuration
MySQL-mmm is
a set of flexible scripts scripts to perform monitoring/failover and management
of MySQL master-master replication configurations (with only one node writable
at any time).
The
structure

OS: CentOS 6.4 64 bit
MySQL 5.6.11 64 bitMysql-mmm-2.2.1
VIP 192.168.1.151 writer
192.168.1.155 reader
192.168.1.156 reader
192.168.1.157 reader
Step 1: install mysql 5.6.11 on 192.168.1.200(db1), 192.168.1.144(db2), 192.168.1.153(db3)
My.cnf on 192.168.1.200(db1)

My.cnf on 192.168.1.144(db2)

My.cnf on
192.168.1.153(db3)

Step 2: start all mysql service and create a user for replication on 3 MySQL server.
192.168.1.200(db1)
Grant replication slave on *.* to ‘keepalived’@’192.168.1.144’ identified by ‘123123’;
Grant replication slave on *.* to ‘keepalived’@’192.168.1.153’ identified by ‘123123’;
Grant replication slave on *.* to ‘keepalived’@’192.168.1.144’ identified by ‘123123’;
Grant replication slave on *.* to ‘keepalived’@’192.168.1.153’ identified by ‘123123’;
192.168.1.144(db2)
Grant replication slave on *.* to ‘keepalived’@’192.168.1.200’ identified by ‘123123’;
Grant replication slave on *.* to ‘keepalived’@’192.168.1.153’ identified by ‘123123’;
Grant replication slave on *.* to ‘keepalived’@’192.168.1.200’ identified by ‘123123’;
Grant replication slave on *.* to ‘keepalived’@’192.168.1.153’ identified by ‘123123’;
192.168.1.153(db3)
Grant replication slave on *.* to ‘keepalived’@’192.168.1.200’ identified by ‘123123’;
Grant replication slave on *.* to ‘keepalived’@’192.168.1.144’ identified by ‘123123’;
Step 3: Configure db1 and db2 as multi-master and db1->db3 as master-slave.
Make sure master-master-slave running well.
db1(192.168.1.200)

Db1 as
master of db2 and db3, also as slave of db2.
Db2(192.168.1.144)

Db2 as
master of db1 and also as slave of db1
Db3(192.168.1.153)

Db3 as
slave of db1(192.168.1.200)
Step 4:
test master-master-slave.
Login to
db1 and create a table, db2 insert record, check data from db3.
Db1: create table
Db2: insert
record


Ok, 3 mysql
db mms working fine.
Step 5:
install packages for mysql-mmm.
Yum install gcc –y
Yum install gcc* -y
Yum install perl* -y
Yum install bison –y
Yum install ncurses-devel -y
Yum install make –y
#perl –MCPAN –e shell
cpan> install Algorithm::Diff
cpan> install DBI
cpan>install Log::Dispatch
cpan> install Log::Log4perl
cpan> install Mail::Send
cpan> install Net::ARP
cpan> install Proc::Daemon
cpan> install Time::HiRes
cpan>install DBD::mysql
cpan>install File::stat
cpan>install File:basename
Monitor server(192.168.1.193) install below per packages
# perl -MCPAN -e shell
cpan> install Algorithm::Diff
cpan> install Class::Singleton
cpan> install Log::Dispatch
cpan> install Log::Log4perl
cpan> install Mail::Send
cpan> install Proc::Daemon
cpan> install Thread::Queue
cpan> install Time::HiRes
cpan> install DBI
cpan>install DBD::MySQL
Step 6: install mysql-mmm-2.2.1
cd /usr/local/
wget http://mysql-mmm.org/_media/:mmm2:mysql-mmm-2.2.1.tar.gz
mv :mmm2:mysql-mmm-2.2.1.tar.gz mysql-mmm-2.2.1.tar.gz
tar -zxvf mysql-mmm-2.2.1.tar.gz
cd mysql-mmm-2.2.1
make;make install
mysql-mmm location
/usr/lib/perl5/vendor_perl/5.8.8/MMM Perl packages using for MMM
/usr/lib/mysql-mmm MMM script component
/usr/sbin MMM command path
/var/log/mysql-mmm MMM log path
/etc/mysql-mmm MMM configure file path
/etc/init.d/ Agent and monitor startup script.
MySQL>grant super,replication client,process on *.* to 'mmm_agent'@'192.168.1.200' identified by '123123';
MySQL>grant super,replication client,process on *.* to 'mmm_agent'@'192.168.1.144' identified by '123123';
MySQL>grant super,replication client,process on *.* to 'mmm_agent'@'192.168.1.153' identified by '123123';
MySQL>grant super,replication client,process on *.* to 'mmm_agent'@'192.168.1.193' identified by '123123';
Configure mysql_agent.cnf
Db1:
[root@centos mysql-mmm]# cat mmm_agent.conf
include mmm_common.conf
this db1
[root@centos mysql-mmm]#
Db2:
[root@CENTOS2 mysql-mmm]# cat mmm_agent.conf
include mmm_common.conf
this db2
[root@CENTOS2 mysql-mmm]#
Db3:
[root@CENTOS3 mysql-mmm]# cat mmm_agent.conf
include mmm_common.conf
this db3
[root@CENTOS3 mysql-mmm]#
Configure /etc/mysql-mmm/mmm_common.cnf on db1 and copy from db1 to db2, db3 and monitor server (192.168.1.193)

Configure mmm_mon.conf on monitor server (192.168.1.193)

[root@centos mysql-mmm]# service mysql-mmm-agent start;
Daemon bin: '/usr/sbin/mmm_agentd'
Daemon pid: '/var/run/mmm_agentd.pid'
Starting MMM Agent daemon... Ok
Start mysql-mmm-monitor on monitor server 192.168.1.193
[root@CENTOS4 mysql-mmm]# service mysql-mmm-monitor start;
Daemon bin: '/usr/sbin/mmm_mond'
Daemon pid: '/var/run/mmm_mond.pid'
Starting MMM Monitor daemon: Ok
[root@CENTOS4 mysql-mmm]# mmm_control show;
db1(192.168.1.200) master/ONLINE. Roles: reader(192.168.1.156), writer(192.168.1.151)
db2(192.168.1.144) master/ONLINE. Roles: reader(192.168.1.155)
db3(192.168.1.153) slave/ONLINE. Roles: reader(192.168.1.157)
[root@CENTOS4 mysql-mmm]# mmm_control checks all
db2 ping [last change: 2013/09/19 15:08:17] OK
db2 mysql [last change: 2013/09/19 15:08:17] OK
db2 rep_threads [last change: 2013/09/19 15:08:17] OK
db2 rep_backlog [last change: 2013/09/19 15:08:17] OK: Backlog is null
db3 ping [last change: 2013/09/19 15:08:17] OK
db3 mysql [last change: 2013/09/19 15:08:17] OK
db3 rep_threads [last change: 2013/09/19 15:08:17] OK
db3 rep_backlog [last change: 2013/09/19 15:08:17] OK: Backlog is null
db1 ping [last change: 2013/09/19 15:08:17] OK
db1 mysql [last change: 2013/09/19 15:08:17] OK
db1 rep_threads [last change: 2013/09/19 15:08:17] OK
db1 rep_backlog [last change: 2013/09/19 15:08:17] OK: Backlog is null
Set read_only=on on db2 and db3
set global read_only=on;
Use another client try to connect mysql with those 4 VIPs.


[root@CENTOS4 mysql-mmm]# mmm_control show
db1(192.168.1.200) master/ONLINE. Roles: reader(192.168.1.156), writer(192.168.1.151)
db2(192.168.1.144) master/ONLINE. Roles: reader(192.168.1.155)
db3(192.168.1.153) slave/ONLINE. Roles: reader(192.168.1.157)
Stop mysql service on db1
[root@CENTOS4 mysql-mmm]# mmm_control show
db1(192.168.1.200) master/HARD_OFFLINE. Roles:
db2(192.168.1.144) master/ONLINE. Roles: reader(192.168.1.155), writer(192.168.1.151)
db3(192.168.1.153) slave/ONLINE. Roles: reader(192.168.1.156), reader(192.168.1.157)
Connect with VIP and insert a record

[root@CENTOS4 mysql-mmm]# mmm_control show
db1(192.168.1.200) master/AWAITING_RECOVERY. Roles:
db2(192.168.1.144) master/ONLINE. Roles: reader(192.168.1.155), writer(192.168.1.151)
db3(192.168.1.153) slave/ONLINE. Roles: reader(192.168.1.156), reader(192.168.1.157)
db1 status awaiting_recovery, it’s because during the db1 stopping, we insert a new record to table t.
try mmm_control set_online db1
[root@CENTOS4 mysql-mmm]# mmm_control set_online db1
OK: State of 'db1' changed to ONLINE. Now you can wait some time and check its new roles!
[root@CENTOS4 mysql-mmm]# mmm_control show
db1(192.168.1.200) master/ONLINE. Roles: reader(192.168.1.156)
db2(192.168.1.144) master/ONLINE. Roles: reader(192.168.1.155), writer(192.168.1.151)
db3(192.168.1.153) slave/ONLINE. Roles: reader(192.168.1.157)
---------------------------------The End------------------------------------------------

Wednesday, 11 September 2013
CentOS6.4 MySQL Keepalive configuration
Master_1: 192.168.1.200
Master_2: 192.168.1.144
VIP:192.168.1.151
Master_1:

 Step 1: install MySQL on 192.168.1.200 and 192.168.1.144, here I am using the binary file to install.
Master_1


Step 3: install keepalived on both 2 nodes.


Step 5: vi /etc/keepalived/keepalived.conf and do keepalived configuration on master_1

 Step 7: startup keepalived on master_1, from log message can see the virtual ip 192.168.1.151 up already.


Step 9: create a MySQL user for both master_1 and master_2

Step 10: try to test mysql VIP connection from a client

Master_1 stop keepalived service, log show VIP remove from 192.168.1.200 already.

Check on Master_2, message show VIP 192.168.1.151 add to master_2 already.


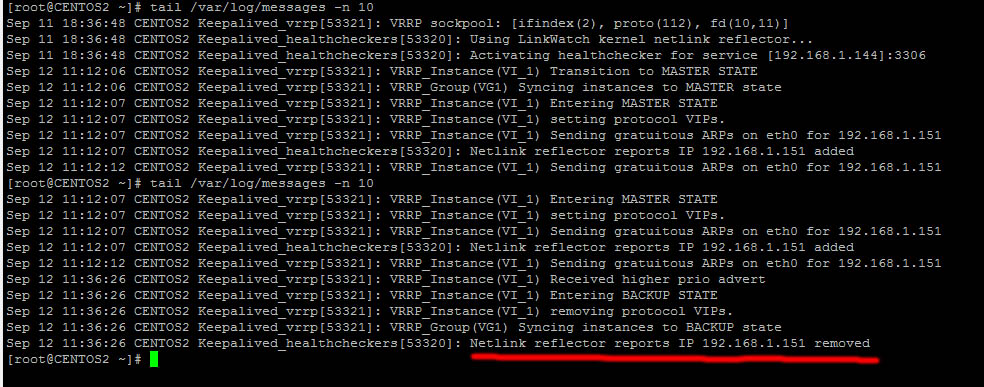
Stop MySQL on master_1, log show keepalived service auto stopped on master_1


Master_2: 192.168.1.144
VIP:192.168.1.151
Master_1:
Master_2:
Master_1
Master_2
MySQL configure
file on Master_1
MySQL
configure file on Master_2
Step 2: Check the master-slave running status on both side
Master_1:
Master_2:
Now the multiple master running well already, next we will install and configure the keepalived
yum install default path is /etc/keepalived/
Step 4: create MySQL notify down shell script on both nodes.
Step 6: vi /etc/keepalived/keepalived.conf and do keepalived configuration on master_2
Step 8: startup keepalived on master_2
Step 11: test keepalived failover
Keep ping the VIP through client side, and stop the keepalived service on master_1(192.168.1.200), see whether can failover to master_2(192.168.1.144)Master_1 stop keepalived service, log show VIP remove from 192.168.1.200 already.
Start keepalived on master_1 again, the VIP switch from master_2 to master_1
Step 12: Test MySQL failover
1: Stop mysql service on master_1, check VIP whether can failover to master_2Stop MySQL on master_1, log show keepalived service auto stopped on master_1
VIP
failover to Master_2 already.
2:start
mysql and keepalived service on master_1, see whether VIP switch to master_1
The
failover usually 3-5 seconds, when do switching, MySQL query will encounter error message.
The End
Tuesday, 27 August 2013
Configure SQL Server named Instance to use default port 1433
First step, let’s see the default configuration on SQL
Server TCP/IP,

As you can see, there have a value 52742 for ‘IPALL’, it’s a
dynamic port for SQL Server, when we try to connect this instance, we must set
the server name as IP+’\’+InstanceName+’,’+Port

Here I will show you how to configure a static port for
named instances.
Open SQL Server Configuration Manager, expand the [SQL
Server Network Configuration] and select [Protocols for DBA], at the right hand
area, select [TCP/IP]->right click and choose [properites]

Delete the value of TCP Dynamic ports and set the next TCP
Port value to 1433, Click [ok] close the TCP/IP Properties window and restart
the SQL Server Services.

Now when connect from SSM client, the server name can simply
set an IP only.

Subscribe to:
Posts (Atom)