Wednesday, 11 September 2013

CentOS6.4 MySQL Keepalive configuration

Master_1: 192.168.1.200
Master_2: 192.168.1.144
VIP:192.168.1.151
Master_1:


Master_2:
 
 Step 1: install MySQL on 192.168.1.200 and 192.168.1.144, here I am using the binary file to install.
Master_1

Master_2
 
MySQL configure file on Master_1
 

MySQL configure file on Master_2

 
Step 2: Check the master-slave running status on both side
Master_1:


Master_2:


Now the multiple master running well already, next we will install and configure the keepalived
 
 Step 3: install keepalived on both 2 nodes.

yum install default path is /etc/keepalived/
Step 4: create MySQL notify down shell script on both nodes.


 Step 5: vi /etc/keepalived/keepalived.conf  and do keepalived configuration on master_1

Step 6: vi /etc/keepalived/keepalived.conf  and do keepalived configuration on master_2
 
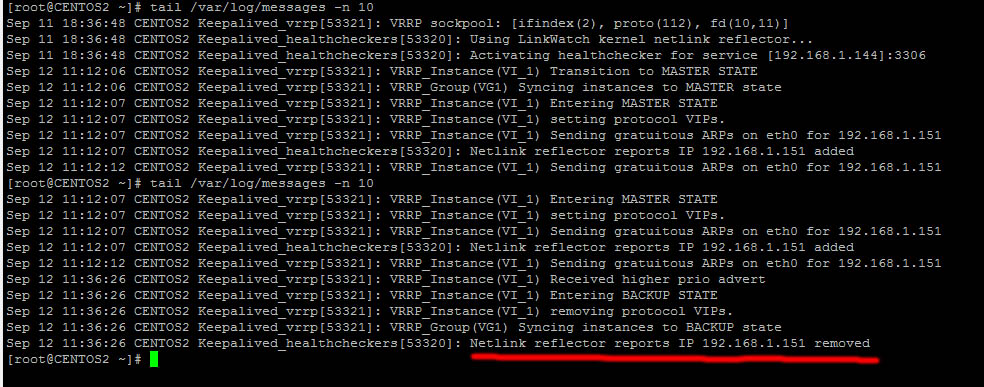
 Step 7: startup keepalived on master_1, from log message can see the virtual ip 192.168.1.151 up already.

Step 8: startup keepalived on master_2


 Step 9:  create a MySQL user for both master_1 and master_2


 Step 10: try to test mysql VIP connection from a client

Step 11: test keepalived failover
Keep ping the VIP through client side, and stop the keepalived service on master_1(192.168.1.200), see whether can failover to master_2(192.168.1.144)
Master_1 stop keepalived service, log show VIP remove from 192.168.1.200 already.


 Check on Master_2, message show VIP 192.168.1.151 add to master_2 already.

Start keepalived on master_1 again, the VIP switch from master_2 to master_1
 
 
Step 12: Test MySQL failover
1: Stop mysql service on master_1, check VIP whether can failover to master_2
Stop MySQL on master_1, log show keepalived service auto stopped on master_1
 
 
VIP failover to Master_2 already.


2:start mysql and keepalived service on master_1, see whether VIP switch to master_1


The failover usually 3-5 seconds, when do switching, MySQL  query will encounter error message.


The End

Tuesday, 27 August 2013

Configure SQL Server named Instance to use default port 1433


First step, let’s see the default configuration on SQL Server TCP/IP,

 
As you can see, there have a value 52742 for ‘IPALL’, it’s a dynamic port for SQL Server, when we try to connect this instance, we must set the server name as IP+’\’+InstanceName+’,’+Port
Here I will show you how to configure a static port for named instances.
Open SQL Server Configuration Manager, expand the [SQL Server Network Configuration] and select [Protocols for DBA], at the right hand area, select [TCP/IP]->right click and choose [properites]
Delete the value of TCP Dynamic ports and set the next TCP Port value to 1433, Click [ok] close the TCP/IP Properties window and restart the SQL Server Services.
Now when connect from SSM client, the server name can simply set an IP only.


Monday, 26 August 2013

How to stop expired Windows 2012 auto shutdown every hour

Firstly download PsTools,This tool is provided in zipped format and you need to extract it somewhere. 
Create folder called - PS on C: drive
We will extract all the contents of the zip file in C:\ drive into the folder PS (which we just created)
After that you need to start command prompt with Administrator privileges. To do this--
        ---Open- task manager.
        ---Go to- File
        ---Create- New Task
        ---Check the "Create this task with administrator privileges" checkbox.
        ---Type- cmd
        ---Press- Enter
You will see the command prompt.
Type- c: 
Type- cd /
Type- cd PS
Type- psexec -i -d -s cmd
Click- Agree on the license agreement dialog box
Then you will get another command prompt running under "nt authoriy\system"
To check if the command prompt is running under "nt authority\system"--
Type- whoami
You should see nt authority\system.
Type- sc delete WLMS
Type- regedit
The above command will open registry editor
Navigate to- HKEY_LOCAL_MACHINE->System->CurrentControlSet->Services
Locate- WLMS
Right click the Key and press delete.
Restart the computer
The simple way of doing it would be to open command prompt with administrator privileges and run the command  "sc delete WLMS" and then delete the WLMS key from the registry. However, if this doesn't work, you can try the above method which will work for sure..

Thursday, 22 August 2013

Install MySQL 5.6 binary on CentOS 6.4 64 bit

[root@CentOS local]# groupadd mysql
[root@CentOS local]# useradd -r -g mysql mysql
[root@CentOS local]# cd /usr/local
[root@CentOS local]# tar zxvf /usr/local/mysql-5.6.11-linux-glibc2.5-x86_64.tar.gz
[root@CentOS local]# ln -s /usr/local/mysql-5.6.11-linux-glibc2.5-x86_64 mysql
[root@CentOS local]# cd mysql
[root@CentOS mysql]# chown -R mysql .
[root@CentOS mysql]# chgrp -R mysql .
[root@CentOS mysql]# ls -la
total 84
drwxr-xr-x. 13 mysql mysql  4096 May  2 03:54 .
drwxr-xr-x. 13 root  root   4096 May  2 03:55 ..
drwxr-xr-x.  2 mysql mysql  4096 May  2 03:54 bin
-rw-r--r--.  1 mysql mysql 17987 Apr  5 08:27 COPYING
drwxr-xr-x.  3 mysql mysql  4096 May  2 03:53 data
drwxr-xr-x.  2 mysql mysql  4096 May  2 03:53 docs
drwxr-xr-x.  3 mysql mysql  4096 May  2 03:53 include
-rw-r--r--.  1 mysql mysql  7468 Apr  5 08:27 INSTALL-BINARY
drwxr-xr-x.  3 mysql mysql  4096 May  2 03:53 lib
drwxr-xr-x.  4 mysql mysql  4096 May  2 03:53 man
drwxr-xr-x. 10 mysql mysql  4096 May  2 03:53 mysql-test
-rw-r--r--.  1 mysql mysql  2552 Apr  5 08:27 README
drwxr-xr-x.  2 mysql mysql  4096 May  2 03:54 scripts
drwxr-xr-x. 28 mysql mysql  4096 May  2 03:53 share
drwxr-xr-x.  4 mysql mysql  4096 May  2 03:54 sql-bench
drwxr-xr-x.  3 mysql mysql  4096 May  2 03:54 support-files
[root@CentOS mysql]# scripts/mysql_install_db --user=mysql
WARNING: The host 'CentOS' could not be looked up with ./bin/resolveip.
This probably means that your libc libraries are not 100 % compatible
with this binary MySQL version. The MySQL daemon, mysqld, should work
normally with the exception that host name resolving will not work.
This means that you should use IP addresses instead of hostnames
when specifying MySQL privileges !

Installing MySQL system tables...2013-05-02 04:21:14 0 [Warning] TIMESTAMP with implicit DEFAULT value is deprecated. Please use --explicit_defaults_for_timestamp server option (see documentation for more details).
2013-05-02 04:21:14 6416 [Note] InnoDB: The InnoDB memory heap is disabled
2013-05-02 04:21:14 6416 [Note] InnoDB: Mutexes and rw_locks use GCC atomic builtins
2013-05-02 04:21:14 6416 [Note] InnoDB: Compressed tables use zlib 1.2.3
2013-05-02 04:21:14 6416 [Note] InnoDB: Using Linux native AIO
2013-05-02 04:21:14 6416 [Note] InnoDB: Using CPU crc32 instructions
2013-05-02 04:21:14 6416 [Note] InnoDB: Initializing buffer pool, size = 128.0M
2013-05-02 04:21:14 6416 [Note] InnoDB: Completed initialization of buffer pool
2013-05-02 04:21:14 6416 [Note] InnoDB: The first specified data file ./ibdata1 did not exist: a new database to be created!
2013-05-02 04:21:14 6416 [Note] InnoDB: Setting file ./ibdata1 size to 12 MB
2013-05-02 04:21:14 6416 [Note] InnoDB: Database physically writes the file full: wait...
2013-05-02 04:21:14 6416 [Note] InnoDB: Setting log file ./ib_logfile101 size to 48 MB
2013-05-02 04:21:14 6416 [Note] InnoDB: Setting log file ./ib_logfile1 size to 48 MB
2013-05-02 04:21:15 6416 [Note] InnoDB: Renaming log file ./ib_logfile101 to ./ib_logfile0
2013-05-02 04:21:15 6416 [Warning] InnoDB: New log files created, LSN=45781
2013-05-02 04:21:15 6416 [Note] InnoDB: Doublewrite buffer not found: creating new
2013-05-02 04:21:15 6416 [Note] InnoDB: Doublewrite buffer created
2013-05-02 04:21:15 6416 [Note] InnoDB: 128 rollback segment(s) are active.
2013-05-02 04:21:15 6416 [Warning] InnoDB: Creating foreign key constraint system tables.
2013-05-02 04:21:15 6416 [Note] InnoDB: Foreign key constraint system tables created
2013-05-02 04:21:15 6416 [Note] InnoDB: Creating tablespace and datafile system tables.
2013-05-02 04:21:15 6416 [Note] InnoDB: Tablespace and datafile system tables created.
2013-05-02 04:21:15 6416 [Note] InnoDB: Waiting for purge to start
2013-05-02 04:21:15 6416 [Note] InnoDB: 5.6.11 started; log sequence number 0
2013-05-02 04:21:17 6416 [Note] Binlog end
2013-05-02 04:21:17 6416 [Note] InnoDB: FTS optimize thread exiting.
2013-05-02 04:21:17 6416 [Note] InnoDB: Starting shutdown...
2013-05-02 04:21:19 6416 [Note] InnoDB: Shutdown completed; log sequence number 1625977
OK

Filling help tables...2013-05-02 04:21:19 0 [Warning] TIMESTAMP with implicit DEFAULT value is deprecated. Please use --explicit_defaults_for_timestamp server option (see documentation for more details).
2013-05-02 04:21:19 6439 [Note] InnoDB: The InnoDB memory heap is disabled
2013-05-02 04:21:19 6439 [Note] InnoDB: Mutexes and rw_locks use GCC atomic builtins
2013-05-02 04:21:19 6439 [Note] InnoDB: Compressed tables use zlib 1.2.3
2013-05-02 04:21:19 6439 [Note] InnoDB: Using Linux native AIO
2013-05-02 04:21:19 6439 [Note] InnoDB: Using CPU crc32 instructions
2013-05-02 04:21:19 6439 [Note] InnoDB: Initializing buffer pool, size = 128.0M
2013-05-02 04:21:19 6439 [Note] InnoDB: Completed initialization of buffer pool
2013-05-02 04:21:19 6439 [Note] InnoDB: Highest supported file format is Barracuda.
2013-05-02 04:21:19 6439 [Note] InnoDB: 128 rollback segment(s) are active.
2013-05-02 04:21:19 6439 [Note] InnoDB: Waiting for purge to start
2013-05-02 04:21:19 6439 [Note] InnoDB: 5.6.11 started; log sequence number 1625977
2013-05-02 04:21:19 6439 [Note] Binlog end
2013-05-02 04:21:19 6439 [Note] InnoDB: FTS optimize thread exiting.
2013-05-02 04:21:19 6439 [Note] InnoDB: Starting shutdown...
2013-05-02 04:21:21 6439 [Note] InnoDB: Shutdown completed; log sequence number 1625987
OK

To start mysqld at boot time you have to copy
support-files/mysql.server to the right place for your system

PLEASE REMEMBER TO SET A PASSWORD FOR THE MySQL root USER !
To do so, start the server, then issue the following commands:

  ./bin/mysqladmin -u root password 'new-password'
  ./bin/mysqladmin -u root -h CentOS password 'new-password'

Alternatively you can run:
  ./bin/mysql_secure_installation
which will also give you the option of removing the test
databases and anonymous user created by default.  This is
strongly recommended for production servers.

See the manual for more instructions.
You can start the MySQL daemon with:
  cd . ; ./bin/mysqld_safe &
You can test the MySQL daemon with mysql-test-run.pl
  cd mysql-test ; perl mysql-test-run.pl
Please report any problems with the ./bin/mysqlbug script!
The latest information about MySQL is available on the web at
  http://www.mysql.com
Support MySQL by buying support/licenses at http://shop.mysql.com
New default config file was created as ./my.cnf and
will be used by default by the server when you start it.
You may edit this file to change server settings

[root@CentOS mysql]# chown -R root .
[root@CentOS mysql]# chown -R mysql data
[root@CentOS mysql]# ls support-files
binary-configure  magic  my-default.cnf  mysqld_multi.server  mysql-log-rotate
[root@CentOS mysql]# cp support-files/my-default.cnf /etc/my.cnf
[root@CentOS mysql]# cp support-files/mysql.server /etc/init.d/mysql
[root@CentOS mysql]# bin/mysqld_safe --user=mysql &
[1] 6468
[root@CentOS mysql]# 130502 04:23:50 mysqld_safe Logging to '/usr/local/mysql/da
130502 04:23:50 mysqld_safe Starting mysqld daemon with databases from /usr/loca
[root@CentOS mysql]# mysql
-bash: mysql: command not found
[root@CentOS mysql]# bin/mysql
Welcome to the MySQL monitor.  Commands end with ; or \g.
Your MySQL connection id is 1
Server version: 5.6.11 MySQL Community Server (GPL)

Copyright (c) 2000, 2013, Oracle and/or its affiliates. All rights reserved.
Oracle is a registered trademark of Oracle Corporation and/or its
affiliates. Other names may be trademarks of their respective
owners.

Type 'help;' or '\h' for help. Type '\c' to clear the current input statement.
mysql> exit
Bye
[root@CentOS mysql]# bin/mysqladmin -u root password '1234';
[root@CentOS mysql]# bin/mysql -uroot -p
Enter password:
Welcome to the MySQL monitor.  Commands end with ; or \g.
Your MySQL connection id is 3
Server version: 5.6.11 MySQL Community Server (GPL)

Copyright (c) 2000, 2013, Oracle and/or its affiliates. All rights reserved.
Oracle is a registered trademark of Oracle Corporation and/or its
affiliates. Other names may be trademarks of their respective
owners.

Type 'help;' or '\h' for help. Type '\c' to clear the current input statement.
mysql> show databases;
+--------------------+
| Database           |
+--------------------+
| information_schema |
| mysql              |
| performance_schema |
| test               |
+--------------------+
4 rows in set (0.00 sec)

mysql> exit
Bye
[root@CentOS mysql]# cd
[root@CentOS ~]# cd /usr/lib/mysql/
-bash: cd: /usr/lib/mysql/: No such file or directory
[root@CentOS ~]# cd /usr/local/mysql/
[root@CentOS mysql]# ls -la
total 88
drwxr-xr-x. 13 root  mysql  4096 May  2 04:21 .
drwxr-xr-x. 13 root  root   4096 May  2 03:55 ..
drwxr-xr-x.  2 root  mysql  4096 May  2 03:54 bin
-rw-r--r--.  1 root  mysql 17987 Apr  5 08:27 COPYING
drwxr-xr-x.  5 mysql mysql  4096 May  2 04:23 data
drwxr-xr-x.  2 root  mysql  4096 May  2 03:53 docs
drwxr-xr-x.  3 root  mysql  4096 May  2 03:53 include
-rw-r--r--.  1 root  mysql  7468 Apr  5 08:27 INSTALL-BINARY
drwxr-xr-x.  3 root  mysql  4096 May  2 03:53 lib
drwxr-xr-x.  4 root  mysql  4096 May  2 03:53 man
-rw-r--r--.  1 root  root    943 May  2 04:21 my.cnf
drwxr-xr-x. 10 root  mysql  4096 May  2 03:53 mysql-test
-rw-r--r--.  1 root  mysql  2552 Apr  5 08:27 README
drwxr-xr-x.  2 root  mysql  4096 May  2 03:54 scripts
drwxr-xr-x. 28 root  mysql  4096 May  2 03:53 share
drwxr-xr-x.  4 root  mysql  4096 May  2 03:54 sql-bench
drwxr-xr-x.  3 root  mysql  4096 May  2 03:54 support-files
[root@CentOS mysql]# cd
[root@CentOS ~]# echo "export PATH=$PATH:/usr/local/mysql/bin" >>/etc/profile
[root@CentOS ~]# source /etc/profile
[root@CentOS ~]# mysql -u root -p
Enter password:
Welcome to the MySQL monitor.  Commands end with ; or \g.
Your MySQL connection id is 4
Server version: 5.6.11 MySQL Community Server (GPL)

Copyright (c) 2000, 2013, Oracle and/or its affiliates. All rights reserved.
Oracle is a registered trademark of Oracle Corporation and/or its
affiliates. Other names may be trademarks of their respective
owners.

Type 'help;' or '\h' for help. Type '\c' to clear the current input statement.
mysql> show databases;
+--------------------+
| Database           |
+--------------------+
| information_schema |
| mysql              |
| performance_schema |
| test               |
+--------------------+
4 rows in set (0.00 sec)

mysql> exit
Bye
[root@CentOS ~]# mysql stop;
ERROR 1045 (28000): Access denied for user
'root'@'localhost' (using password: NO)
[root@CentOS ~]# service mysql stop;
Shutting down MySQL..130502 05:37:55 mysqld_safe mysqld from pid file /usr/local/mysql/data/CentOS.pid ended
 SUCCESS!
[1]+  Done                    bin/mysqld_safe --user=mysql  (wd: /usr/local/mysql)
(wd now: ~)
[root@CentOS ~]# service mysql start;
Starting MySQL. SUCCESS!
[root@CentOS ~]# service mysql stop;
Shutting down MySQL.. SUCCESS!
[root@CentOS ~]# ls -la /etc/init.d/mysql
-rwxr-xr-x. 1 root root 10650 May  2 04:23 /etc/init.d/mysql
[root@CentOS ~]# cd /etc
[root@CentOS etc]# ln -s rc.d/init.d .
ln: creating symbolic link `./init.d': File exists
[root@CentOS etc]# chkconfig --add mysql
[root@CentOS etc]# chkconfig --level 345 mysql on
[root@CentOS etc]# cd
[root@CentOS ~]# service mysql start;
Starting MySQL. SUCCESS!
[root@CentOS ~]#

Tuesday, 20 August 2013

Import CSV to MySQL

mysql> load data local infile 'c:\\mysql\\IPCOUNTRY.CSV'
    -> INTO TABLE IPCountryLoc_old
    -> fields TERMINATED BY ','
    -> OPTIONALLY ENCLOSED BY '"'
    -> ESCAPED BY '\\'
    -> LINES TERMINATED BY '\r\n';
Query OK, 8889310 rows affected (2 min 5.59 sec)
Records: 8889310  Deleted: 0  Skipped: 0  Warnings: 0

Tuesday, 6 August 2013

SQL Server 2012 Failover Cluster AlwaysOn with Another stand-alone SQL Node


SQL Server 2012 Failover Cluster AlwaysOn with Another stand-alone SQL Node

We setup a 2 node SQL Server 2012 failover cluster, Node1+Node2


Another stand-alone Node with SQL Server 2012.

Enable the Alwayson feature on Cluster Node1 and restart the SQL Service.
 
Open the Failover Cluster Manager, Add the Node3 to Cluster AlwaysOnCluster.dba.cluster


Once we add the Node3 to Cluster successfully, check from the Failover Cluster Manager, and saw the Node 3 already there.

 
Remote desktop to Node3, enable the alwayson feature on Node3 and restart the SQL Service.

 
Node3 SQL Server was not clustered.

 
From Node1 clustered SQL, we add alwayson group.

 
Follow the wizard, set group name as Group_alwaysOn
 
 Select the testing database AlwaysOnTestDB

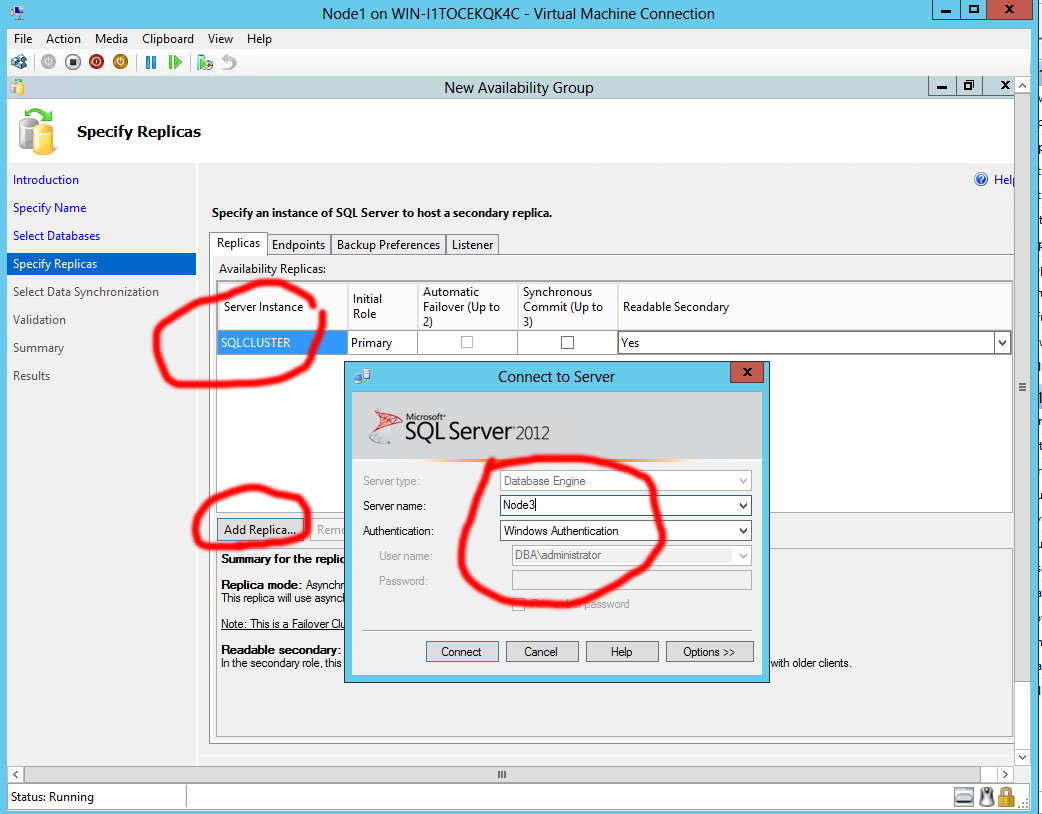
 The Server Instance become to the SQL Cluster name , we set secondary readable to yes
 Set backup preferences to secondary only

 
We will not create a failover for the alwayson, cos we already have failover cluster on Node1 and Node2.

 
Add Node3 SQL Server for replicate.

 
Set Node3 SQL Server readable to yes.

 
Set a shared path for replicates.

 
Validate the AlwaysOn configuration.


AlwaysOn finished successfully.

 
Insert testing data on primary.


Login to Node3 SQL Server, the testing data synced successfully.


Now we test the AlwaysOn failover on SQLCluster, shutdown the Node1 machine, open the Failover Cluster Manager on Node2, waiting around 30 seconds, the Group_AlwaysOn failover to Node2 successfully.


---------------------------------------------------------The End----------------------------------------------------------------